Friday, June 5, 2015

Tuesday, February 28, 2012

Jointing wide boards

Sketchup model available for download HERE.


Thursday, May 12, 2011

Euro Cabs trois


I see some MDF, I want it painted black.

Note drawers are fitted/ installed.  Have to paint the fronts, install hinges and pulls, and they're ready to go.  The blue tape on the corners was for marking reveals to measure against to cut everything.

Tuesday, April 26, 2011

Euro cabs - biscuited drawers

Don't have a router table yet, so the drawers are getting biscuits.  Here're the parts with the insides pre-finished.  Pre-finishing the inside of the drawers will save the nightmare of trying to get an even, drip/ run-free finish applied in all those corners.  Note the short biscuit slots in in the end (taped off from finish to keep bare wood where the glue will go), and the full-length slot close to one edge of each.


One side installed:  the drawer bottom is leaning against it.  The slots close to the bottom edge will capture the drawer bottom.  The un-finished wood left close the ends (where the biscuit slots are) will accept glue.

Bottom fitted into the slot.  Note how sticks up ~1/4" higher than the side - that will fit into the slot in the other drawer side.  The drawer bottoms are sized to be 1/4" bigger (on each side, 1/2" total) than the inside of the drawer.  The slots in the sides are 1/4" deep - if all goes well, when glued up it will be one solid "piece" of wood.  Since this is all plywood, the bottoms will be glued in - there's no need to allow for wood expansion/ contraction in plywood this small.

Other side installed, biscuits in place.  The last side can be dropped on.  The side parts' biscuit slots,  bottom-edge slot, and  bare wood areas make sense when you see this pic.

Lather, rinse, repeat.


Sunday, April 24, 2011

Euro Cabs deux


Four of the five cabs glued up and staged.

Note the drawer slides sitting in the bottom of cab 2 (from the left), and the stack of drawer parts ready to go on the TS.  Drawers should be done today.

Underestimated the amount of edge-banding I'd need.  I guesstimated about 50', bought a 50' roll, and was very mindful of keeping the offcuts small.  Ran out on the LAST side of the last cab - I'm 30" short.  Did some math to figure out if the roll was short, somehow you're looking at 49 + feet of banding in this pic, and I have 30" (of 60" needed) still left.  They didn't short me, they over-ed me.  

Sunday, April 17, 2011

Closing on the sandwich...

Room to work:  4 or 5 cabinets layed out for finish.


The sink base dry fit.

Monday, August 9, 2010

OMG

Planning a move to a house with... a.... THREE.... car... detached... garage.  Power, heat, lights, water, loft.

Woodworking '10-'11 season may be the best ever.

Wednesday, April 21, 2010

Goodbye, desk. Goodbye, house. Goodbye, woodworking


Here's one of the first "in our house" projects to come out of the shop: a "built-in" desk set-up that Wife commissioned for our home office. She took over the office and the desk was banished to the formal living room.
Here it is loaded on the back of a truck, going to a new owner in New Jersey.

All of last WWing season was lost moving our business, now our house is on the market. The desk was the first of several big chunks of furniture we're trying to get rid of to go.

Not clear whether I'll have a shop for much longer, and if I don't, if I'll store tools or sell everything off.

: (

Tuesday, April 13, 2010

Sunday, March 14, 2010

Time is the enemy

I've vowed to never post worthless musings. I break that vow today for a few notes for my own memory.
1. Attended the Reading, PA woodshow with Kent last Sunday. It was more about the ride than the woodworking, but I hoped to meet a few woodnet guys there. I wound up spending most of my time there with Chuck Bender. Chuck, it turns out, knows his stuff. He builds, he designs, he teaches, and is about as approachable a woodworking guru as I've ever had the pleasure of meeting.

2. Chuck was doing a hand-cut dovetail demo and offering to let some spectators in on the action. Despite my "scribing like a girl" (Chuck's exact words), excavating a cave between my tails, and being the world's worst hand-sawyer (which Chuck fixed in two or three sentences), I was able to produce... let's call them "passable"... thruDT's in pine.

Note the saw marks on the inside surfaces of the pins and tails - they fit together right off the saw - no trimming/fitting:3. I was stoked to see a series of articles about design on Chuck's blog, and also that he teaches carving - a class I'd love to take. His shop is in or near Pottstown - certainly do-able.

4. Armed with new desire to own an actual, for real, DT saw, I slathered over the Veritas DT in 20 tooth rip, and made a few ridiculously perfect, effortless cuts with it at the Veritas booth. If you're reading this, and you have $65, you should buy this saw and send it to me.

5. Give the job to a busy person: today is my second day off since about November 2009. By "off," I mean I left work at 11AM. Since then I scrubbed the kitchen, entry way, and powder room floors; folded a bunch of laundry and did a load; had lunch and did a load of dishes; installed the 18T front sprocket on the Vee; and still had time to single-handedly get this monster down the basement stairs and largely assembled (it runs):
It looks considerably more ridiculous in the context of a tiny shop which already has a table saw stuffed in it:

It's smoooooth. I can hardly wait, altho there's much to do, and no time to do it in, before it will make any dust.

Thursday, January 14, 2010

Like a rock


Granite top table saw.... 447lbs... shipped in a welded steel cage. The 10' from the trailer to the garage never seemed so far.

Saturday, July 25, 2009

Woodworking season's over

... it's RIDING season!!

See you again when it starts getting cold.

Monday, May 4, 2009

Closing on the sandwich

Painted headboard in weird lighting.

Waiting for the rain to stop so I can clear out enough room for a trial assembly.

The hardware's installed.

Sunday, May 3, 2009

Too late to help


Top: HF 43430 HVLP stock 1.4 needle.
Bottom: PC PSH1 HVLP accessory 2.2 needle.

Now that I've brushed out the bed, my new tip and needle for shooting latex has arrived.

Sunday, April 26, 2009

Finishing


My fancy spray booth is very sensitive to weather conditions. Apparently hooking up a spray gun and charging the compressor pleases the wind god, who rewards the user with intermittent gusts and breezes - no matter how calm the day's been to that point.
Luckily a lot of stuff is in bloom so there's plenty of little petals and pollen to get thrown against the wet paint.

That diagonal dark line is the shadow from the garage roof.

Thursday, April 23, 2009

Ready for finish


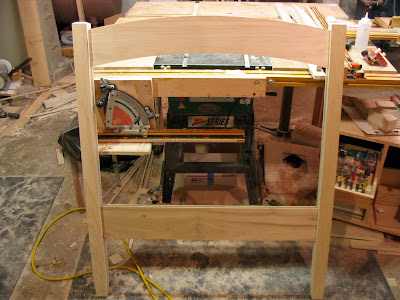
Headboard's in the clamps - woodworking is done.

A lot of stuff happened tonight:
Routed a dado on the inside of each leg to accept the panel (edge guide + plunge router).
Laid out the panel and table/ jig sawed it out.
Laid out the V-grooves to simulate the individual boards and routed them on the new router table.
Planed / chamfered all the faces / edges of the legs and rails.
Rough sanded all the headboard parts.
Glued it up.

If I didn't have to work tomorrow, it would be done. I don't see how I'm going to get multiple coats of paint on it and get it delivered tomorrow night when I'll be working most of the day.

Wednesday, April 22, 2009

Still more bed stuff
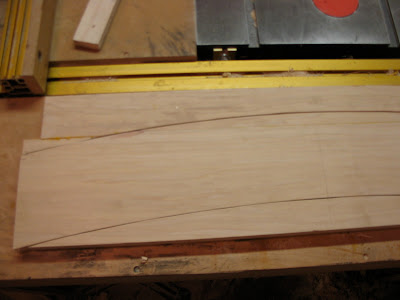
That shorter piece on top has been glued up to the wider piece. The curve was marked out (using a template from a previous project), and a jigsaw was used to cut close to the line.


The template is hot-glued to the rail and used to guide a pattern bit in the router.


The window jig was used to route mortises for floating tenons in the top rail and the legs. A slot-cutter was used to route a dado to accept the panel. I only have one bearing for the slot-cutter, so without jigging up something on the router table the depth of cut is limited to the difference between the bit's radius and the bearing's radius. As luck would have it, that depth intruded into the tenon space a little. With all that tenon glue area and the fact that the panel will be glue in (its MDF), I'm not concerned about it.

Headboard dry-fit. Still have to route dados in the legs between the mortises to accept the panel, then fab a panel and glue it all up. It's not much more work, but it's getting too late to make noise.

Saturday, April 18, 2009

More bed stuff

Deja vu round three.

The screws that hold the hardware to the rails are driven into the endgrain, which doesn't really hold screws well. Some dowels behind the screws will give the threads something to grab.

No dowel stock on hand, so I turned some.


Here they are glued in, sawed off, and planed flush. As I look at this now, I realize I forgot to orient the dowel stock with the grain running perpendicular to the rail. It'll still be much, much better than not having them there, but some screws will be going into edge or rift grain instead of face grain when they encounter those dowels.


After milling up stock for cleats, they're glued and screwed to the inside of the rails. These cleats will support the platform which in turn supports the sleeping human.

The woodworking on the rails and footboard is done. There's a little to do yet on the headboard - maybe another day - then it's ready for paint.

Sunday, April 12, 2009

Bed progress

Glued up the foot board today.


...and yet more DEJA VU.


The looking-worse-for-wear window jig yet again - this time mortising the rails for the bed hardware.


Hardware mortises squared by hand and holes marked and drilled. The extra hole on the right side of the mortise in the board on top and the left side of the mortise in the board on the bottom denote the top edge of the rail.

Saturday, April 11, 2009

Floating tenons

Using floating tenons the same size as the bed hardware allows the router "window" template to be used again. This time the mortises are 1" deep, and there will be mortises in both the legs ...


...and the rails. Note there are some scraps hot-glued to the back of the window template to align the window properly over the end-grain of the rails.


A scrap is cut to width, planed down, and the edges are rounded over. Once sliced up...


they're the loose tenons that will connect the rails to the legs.